
Once a label is designed, you can print it straight from barxui – to PDF, to a PNG image, or to a physical printer connected through an installed Agent. The Print dialog is opened from the toolbar in the Label Designer, or from Data Manager after selecting one or more records.
The Print Dialog
The Print dialog is titled with the name of the label or query it will use. Two fields at the top are always required:
- Select Printer – choose PDF, PNG’s (Zipped), or any physical printer that has been connected through an installed Agent.
- Copies – how many copies of each record to print.
Below these, three tabs control what gets printed and how.
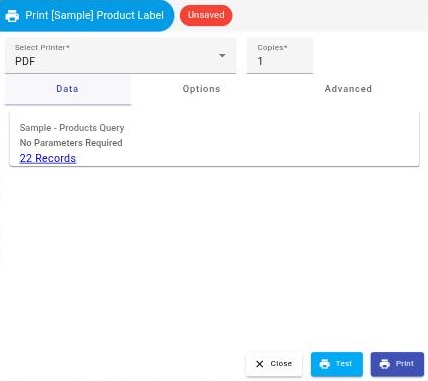
Data
Shows the query barxui will pull records from, along with any parameters it requires. When printing is started from Data Manager instead of the Label Designer, this tab shows a Record Selection summary reflecting the rows you ticked before clicking Print.
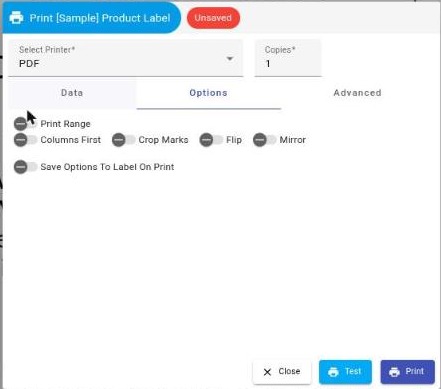
Options
Toggles that control layout and output:
- Print Range – restrict printing to a subset of the records rather than the full result set.
- Columns First – when a page holds multiple labels, fill columns before rows.
- Crop Marks – add trim marks around each label.
- Flip and Mirror – reverse the label output, useful for some label stock and ribbon combinations.
- Save Options To Label On Print – remember the current settings on the label so they’re pre-filled next time.
Advanced
Sets the Filename used for the generated PDF or PNG output. It defaults to the label name, and falls back to that default if the entered name isn’t valid.
Printing Images
Choosing PNG’s (Zipped) as the printer renders each label as a PNG image instead of a PDF. If more than one label or record is being printed, barxui bundles all the resulting images into a single ZIP file for download.
Printing From Data Manager
You can also print directly from a data table, and choose exactly which records get printed in one of two ways.
- Tick the checkbox on each row you want to print. The toolbar shows how many rows are selected, and a Clear Selection button lets you start over.
- Filter the table down to the records you want with a query, then click Select All to select every row currently shown. See Data Manager for more on building and applying queries.


Once your records are selected, click Print in the toolbar. The same Print dialog opens, scoped to just those records.