
barxui allows you to import and use data from many sources. Using the Data Manager, you can:
- upload CSV and Excel files
- view and import data via configured AddOns
- create queries to filter, join and sort imported data
- print designs attached to queries
Tables and Queries
Data is stored in tables. Each table consists of one or more columns. Each column can store a data element of a specific type:
- Text
- Number
- Yes or No / True or False
- Date with/without time
Columns can also define a display format and a default value, which is useful when adding new records. See the table settings option below.
Queries are a mechanism to change the view on a table. All tables have at least one query – the Default query. You can use queries to filter a table. Filters are configured against one or more columns. Filters can contain static values or can be entered when running a query.
Queries can also be used to join to one other table. This is useful when you need to lookup reference data, e.g a supplier record can join to many products, or a product can join to a single supplier record.
See the Query section below for more details.
Feature:
barxui Agent provides the ability to upload data from SQL Server or CSV/Excel files from your local system, either as a manual task or on a schedule.
Table Selection
The top toolbar on this page displays a list of all the available tables. Table names will be listed alphabetically.
Some tables may be controlled / owned by an AddOn. In this case, a padlock icon will be next to the table name.
Searching
You can search for any value across the entire table. Searching uses a partial, case-insensitive match. So, for example, searching for “wid” will find records that contain “Widget”, “Red widget”, “Width: 10mm” etc.
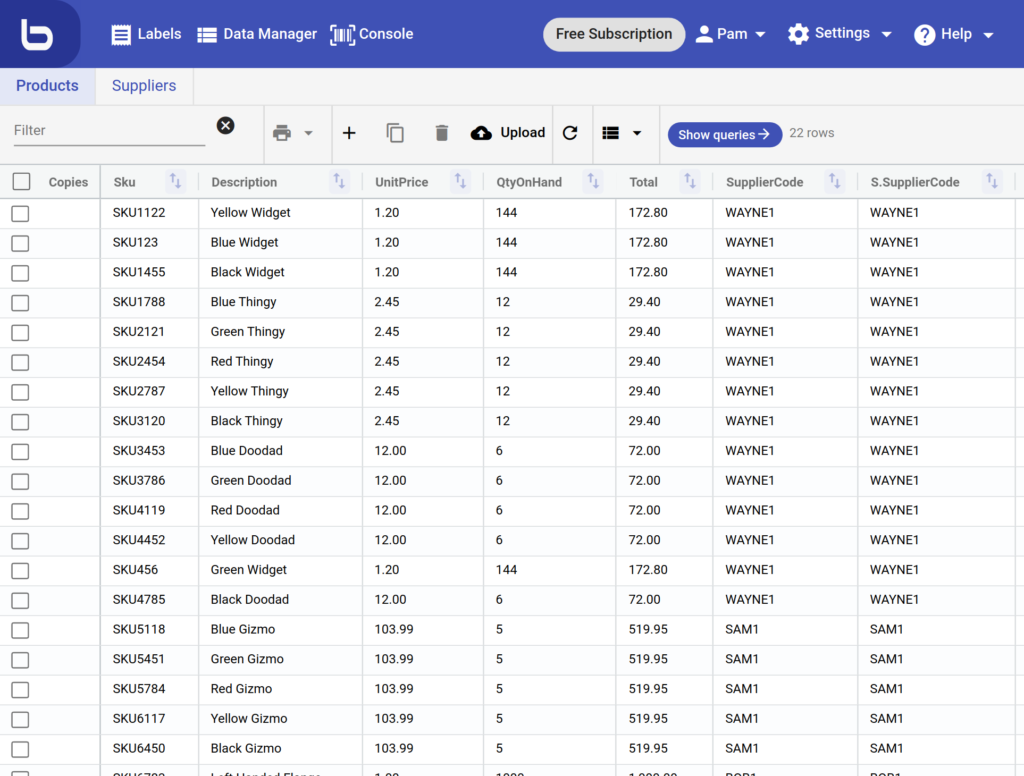
Data Grid
The data grid display all the rows in the selected table. Scrolling down the rows will load more data as required.
Copies Column
The copies column is the first column display for all tables. It serves two purposes.
- Allow selection of the row for printing.
- Allow a specific number of copies to be printed.
The copies column header also allows selection and un-selection of all rows.
See the print option below for more details on printing selected rows.
Ordering Rows
You can sort the rows by clicking the up/down arrows on each column header.

Clicking the header will cycle through ascending sorted order, descending sorted order, no order. The sort order is saved with the currently selected query. See below for more information on queries.
Menu Options
The menu options in the Data Manager can change depending on your permissions and the selected table. Below is a description of each option, includes details of availability.
| Option | Description | Available? |
|---|---|---|
| New Record | Adds a new empty row to the current table. | When table is imported or uploaded and not owned by AddOn. Operators need permission to edit table. |
| Delete Record | Deletes the currently selected record from the current table. | When table is imported or uploaded and not owned by AddOn. Operators need permission to edit table. |
| Copy Record | Copied the currently selected record from the current table. | When table is imported or uploaded and not owned by AddOn. Operators need permission to edit table. |
| Refresh | Reload all data in the current table. | Always. |
| Print all or selected rows with a linked design. | If query on the selected table is linked to a design. | |
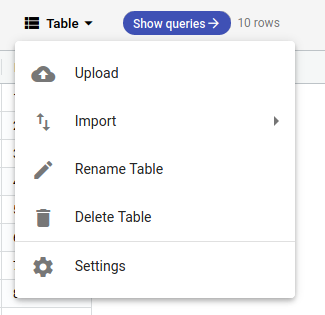
| Table | This is a sub-menu of options for the entire table. See below. | For Admin and Power Users only. |
The table menu includes the following options:
| Option | Description | Available? |
|---|---|---|
| Upload | Create a new table by uploading an Excel or CSV file. See the Upload section below. | Admin or Power users only. |
| Import | Import a new table using an AddOn. Consult the help for the particular AddOn for the options available when importing. | Only is AddOns are configured that support importing. |
| Rename Table | Rename the currently selected table. | Admin or Power users only. |
| Delete Table | Deletes the currently selected table. | Admin or Power users only. |
| Settings | Update the table structure. See below. | Admin or Power users only. For tables not owned by an AddOn. |
Uploading Tables
barxui can create a table from an uploaded CSV or Excel files.
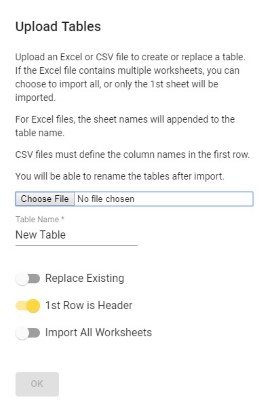
When uploading a file the import will process the entire file. There are some rules regarding the file format and content.
CSV Files
Column names in the file will be formatted with an upper case first character and spaces will be removed. Column names must be unique and will have a number appended to the name if there is a conflict with another column. If uploading a CSV file that does not have a column header row, columns names will be generated like Excel columns, e.g. A1, A2, etc.
Blank lines in the CSV file will terminate the import.
Values in columns can optionally be delimited with single (‘) or double (“) quotation marks. Values that include a comma (, ) must be delimited with quotation marks.
Importing a CSV file will create a single table using the specified table name.
Excel
Column names in each sheet will be formatted with an upper case first character and spaces will be removed. Column names must be unique and will have a number appended to the name if there is a conflict with another column. If a sheet does not have a column header row, columns names will be used, e.g. A1, A2, etc.
All sheets must start on the most top left cell, A1. Rows with a blank first cell will terminate the import.
Importing an Excel file will create tables named using the specified table name, appended with the sheet name.
Important:
Be aware of privacy & security when importing data. Users of barxui should have the necessary permission to view any sensitive data you expose here. Of course, only users in your organisation will be able to view your data but check with your IT person or boss before uploading any data – your organisations policies may (should?) have rules around doing so.
Queries
Queries are a mechanism to change the view on a table. All tables have at least one query – the Default query.
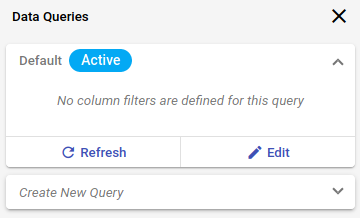
Use the Allow Operator Access switch to enable or disable access to this query by users with the operator role.
Filtering
You can use queries to filter a table. In the query panel, click Edit then click Add Column Filter and select a column.
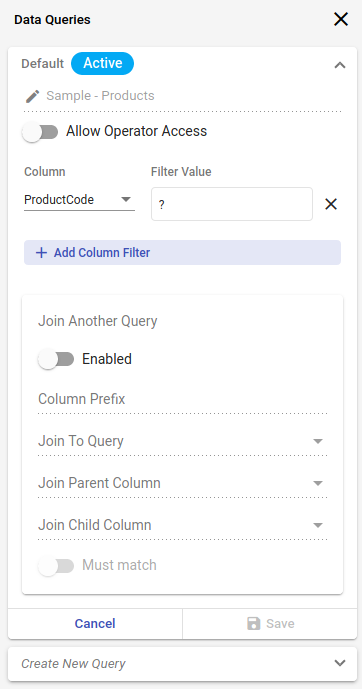
Enter a value for a static filter or enter a question mark (?) by itself to be prompted for a value when the query is executed.
Filters are configured against one or more columns. Filters can contain static values or can be entered when running a query. Save the query.
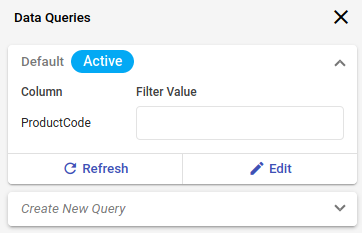
You can now specify a value and run the query by clicking Refresh. Leaving the filter value blank will display all rows.
Tip:
There are some special values you can enter in the filter value, either when designing the query or when running it:
- $user – will match to the currently logged in user email.
- > – Value is greater than x, eg. ‘>100’.
- < – Value is less than x, eg. ‘<100’.
- ! – Value is not equal, eg. ‘!100’.
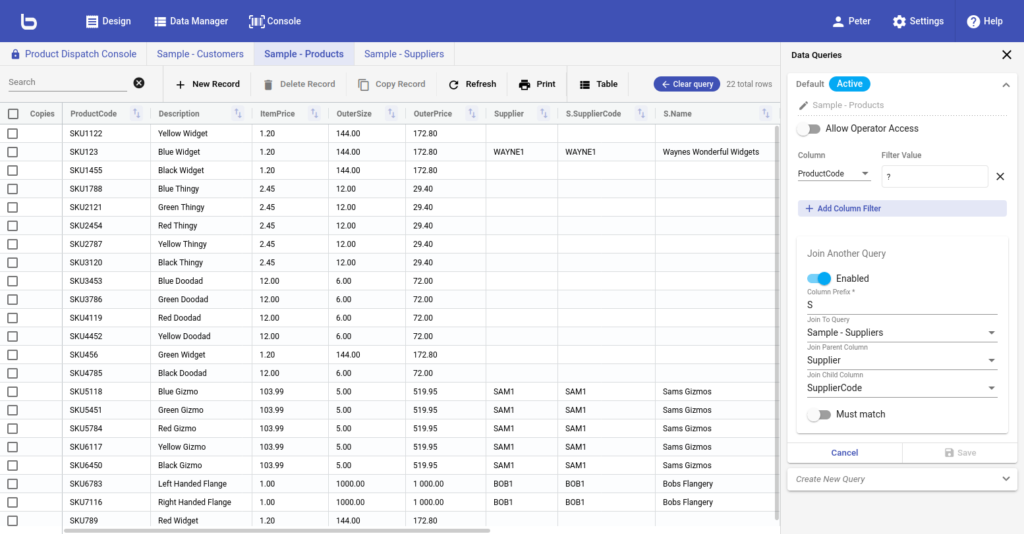
Joining Queries
Queries can be used to join to two tables. This is useful when you need to lookup reference data, eg. a supplier record can join to many products, or a product can join to a single supplier record.
In this example, Sample Products includes a supplier code. We join on this to the Sample Suppliers table.
Note:
The column prefix cannot be the same as an existing column name.
Use the ‘Must Match’ switch if you only want to see rows that have a matching record in the joined query. If there is not record to join to then the entire row is excluded from the result.
Printing
If you have a label linked to the current query you can print directly from the data manager. The print menu will display a list of all labels available.

If the query includes filters the values for these can be entered on the print dialogue.
Printing Specific Rows
Whether you have filters on a query or not, you can also manually selected which rows to print using the copies column. Select the rows you want to print and set the number of copies to print for each row.
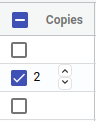
In this case, the print dialogue will display the count of selected rows and not prompt for filter values.
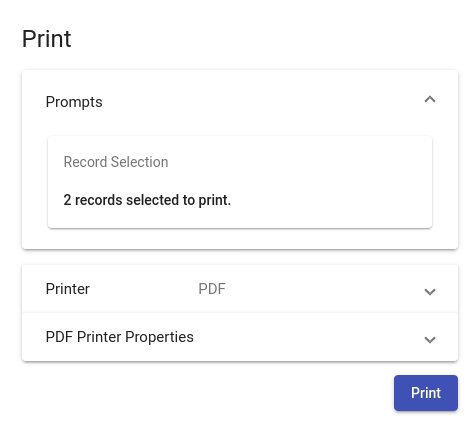
The print dialogue also includes a setting for the number of copies.
Changing this value will act as a multiply when printing. For example, if I set copies on a row to 2 and copies in the print dialogue to 3, barxui will print 6 copies.